Error: “PhotoPearls.pkg can not be opened because macOS cannot verify that it doesn’t contain malware”
Follow these steps to resolve the issue:
- Open System Preferences: Click on the Apple icon in the top-left corner of your screen and select ‘System Preferences’ from the dropdown menu.
- Security & Privacy Settings: In the System Preferences window, click on ‘Security & Privacy’.
- Allow App Installation: In the ‘Security & Privacy’ settings, go to the ‘General’ tab. At the bottom of this window, you should see a message saying “PhotoPearls.pkg was blocked from use because it is not from an identified developer.” Click on the ‘Open Anyway’ button next to this message.
- Confirm Your Action: A warning dialog may appear asking if you are sure you want to open the app. Click ‘Open’ to proceed.
- Complete the Installation: The ‘PhotoPearls.pkg’ should now open without any issues, and you can proceed with the installation as usual.
Tutorial: How to unlock PhotoPearls with your activation code
Q: Save as PDF
Save a pattern as a PDF on Mac
- Choose Print pattern > Print (Black & White).
- A printing dialog box will open up.
- Ignore the Print button.
- Near the bottom of the Print window, click on the drop-down menu labeled PDF.
- Click on Save as PDF in the drop-down menu.
- Choose the location and a name, and click Save o save your document as a PDF.
Save a pattern as a PDF on Windows 10
- Choose Print pattern > Print (Black & White).
- A printing dialog box will open up.
- Select Microsoft Print to PDF as your printer.
- Click Print, a window will open up, Choose the location and a name, and click Save to save your document as a PDF.
Online Pattern Maker (Video tutorial)
How to Convert Photos into Beaded Pixel Art (Video tutorial)
1. Select photo
Start by selecting a photo for your project.
2. Select size
Choose the size of your project.
Select the size of your project from the list of preset sizes or change the text fields “Width” and “Height” to the desired size, calculated in number of beads or centimeters/inch.
3. Select area
Crop to cut out any unwanted parts of the photo.
Recommended doing for facial portraits if the project is less than six pegboards.
You can also move the box around by clicking anywhere inside of it and then dragging your cursor to move it around.
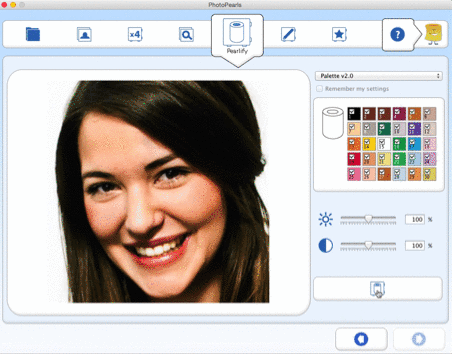
4. Pearlify
Click the Pearlify button to convert your selected photo into the pattern.
To improve the pattern, you can add or remove bead colors and change the brightness and contrast.
5. Edit
In edit mode, you can use the brush tool to draw freely or to retouch the pattern. With the eraser, you can remove beads completely from the pattern.
6. Print / Save
When you´re finished editing, click the “Save bead pattern” button to save your changes.
Click on the button “Print bead pattern” to print your pattern, you can choose between black and white or color printing.
Click the “Print Shopping List” button to print the shopping list for your pattern.
How to draw your own bead patterns (Video tutorial)
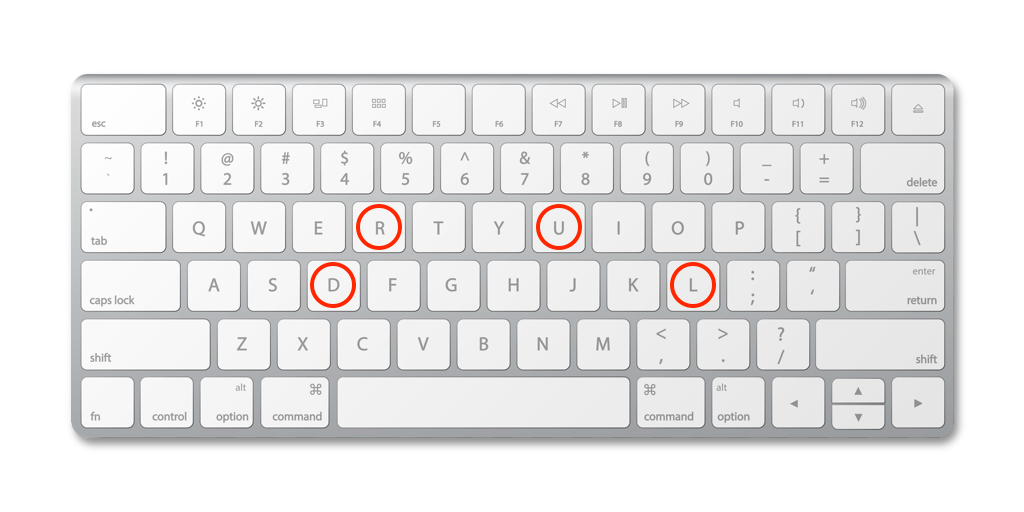
How to move the ruler in the pattern viewer with the keyboard
To move the ruler with the keyboard, use the following keys:
U = Up
D = Down
L = Left
R = Right
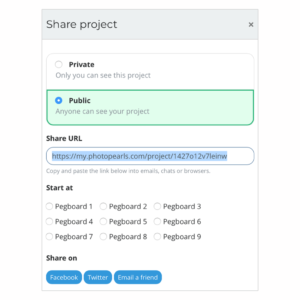
Share project
- Go to the project you wish to share.
- Click on Share project in the top menu on the pattern viewer.
- Change the status from private to public.
- Copy the Sharing URL to share the link via email message, on social media or in a chat conversation.
Ironing instructions
Visit nabbibeads.com for ironing instructions.
Five steps to improve your pattern
- Step 1
- Choose the right photo for your project. Read the article: Choose the right picture.


- Choose the right photo for your project. Read the article: Choose the right picture.
- Step 2
- Crop the image to remove unnecessary content. The more content in the photo, the more likely the picture can become difficult to interpret if you are doing a less than six pegboards project.

- Crop the image to remove unnecessary content. The more content in the photo, the more likely the picture can become difficult to interpret if you are doing a less than six pegboards project.
- Step 3
-
- Remove unwanted colors by opt-out color numbers in the color palette.
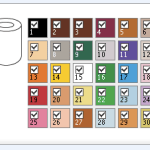
- To find out the bead color in the project; move the mouse cursor over the bead in the preview image to see the color number or click on the button Color map to see all the colors used in the project.
-
- Step 4
- Change the brightness and contrast to improve the outcome.

- Change the brightness and contrast to improve the outcome.
- Step 5
- To get a better idea of the finished result, take a few steps away from the computer screen, see the beads pattern from a distance, or look at the thumbnail in the last step – Save / Print.
- To get a better idea of the finished result, take a few steps away from the computer screen, see the beads pattern from a distance, or look at the thumbnail in the last step – Save / Print.